coloring tutorial #2
May. 3rd, 2008 08:06 am
Selective coloring tutorial and a psd behind the cut. Made in PS6, should be compatible for all later versions. Not translatable (to the best of my knowledge) to any other program.
Note: This tutorial came about from attempting to duplicate the coloring in this icon, made by ![[profile]](https://www.dreamwidth.org/img/silk/identity/user.png) forsaken_dream2.
forsaken_dream2.
Step One: Open original picture, which was snagged from![[community profile]](https://www.dreamwidth.org/img/silk/identity/community.png) fullsizepmore. Crop it to your liking.
fullsizepmore. Crop it to your liking.
Step Two: Make a new selective coloring layer by selecting Layer > New Adjustment Layer > Selective Color, and input the following values:
Reds:
C: -100
M: +15
Y: +22
B: 0
Yellows:
C: -27
M: -4
Y: +8
B: 0
Neutrals:
C: -11
M: -7
Y: 0
B: 0

Step Three: Make a second selective coloring layer with the following values:
Reds:
C: -100
M: +16
Y: +100
B: 0
Yellows:
C: -100
M: +15
Y: +22
B: 0
Neutrals:
C: +17
M: -11
Y: -18
B: -17

Step Four: Our coloring is now complete. Now we'll add the tiny text box, which honestly, I'm a little obsessed with right now and you will see in most of my icons ^.^ Make a new, blank layer by selecting Layer > New > Layer, or ctrl+shift+n, and stamp a tiny text brush on it in black. Here is the brush I used, made by graphic_xl, who I think no longer exists >.<

Step Five: Use the Rectangle Tool to draw a small white box around your brush stamp. Make sure the edges are sharp, and your settings are all at default (100% opacity, normal blend mode, etc - all these settings are at the top below the toolbar after you click on the Rectangle Tool). The box will be on it's own layer, which will be on top of the brush layer.

Step Six: Drag the white box layer down below the brush layer, and nudge it into place. Then flatten your layers and save!

Too lazy? Already a selective coloring pro? Download the psd file here.
Helpful Hint: If you've read any other tutorials I've done, you may or may not notice that I have used many of the same selective coloring settings, either alone or in tandem with other selective colorings. I have found it helpful that when I find selective coloring settings I like, to save them in their own folder, and then when I'm making graphics, to simply load them and mix and match. Below is a mini-tut on how to save and load selective colorings for later use (so you don't keep having to type in all those obnoxious numbers every time you want to use a particular coloring):
- Start by creating a folder especially for saved selective coloring settings. For convenience, I put my Selective Coloring folder inside the Photoshop Presets folder, where your default brushes and patterns are stored automatically.
- After you enter your selective coloring values into the Selective Color Options box, click the Save button. Find your folder, name your coloring (I have mine named numerically, 1 through 14 so far), and click Save.
- To use your saved coloring later, make a new selective coloring layer, and when the Selective Color Options box comes up, click Load. It should take you to your specified folder. Select a pre-saved coloring and click OK, and it will automatically apply the coloring to your image. Don't like it? Click the Load button again to select another. When you find one you like, simply click OK to close the Selective Color Options Box.
+ Don't Forget To:
+ Comment, especially if you take the psd
+ Feel free to ask questions
+ Let me know if there's a broken link or something I've forgotten
+ Share something you made! :)
Step One: Open original picture, which was snagged from
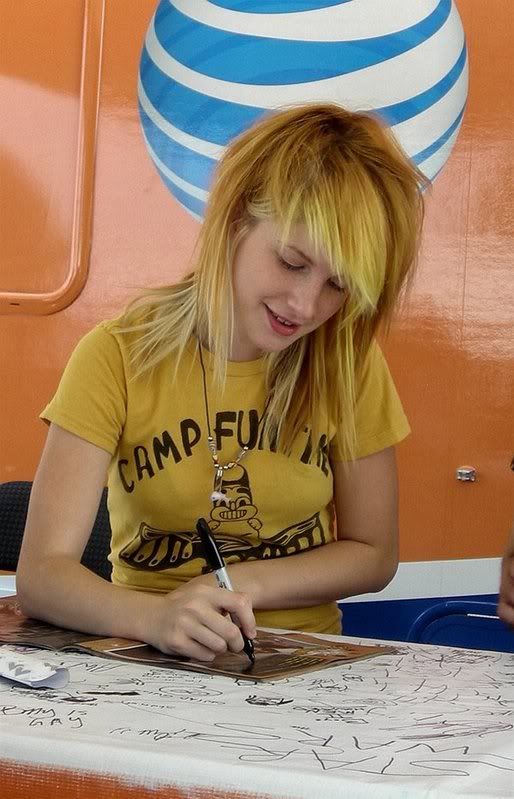
Step Two: Make a new selective coloring layer by selecting Layer > New Adjustment Layer > Selective Color, and input the following values:
Reds:
C: -100
M: +15
Y: +22
B: 0
Yellows:
C: -27
M: -4
Y: +8
B: 0
Neutrals:
C: -11
M: -7
Y: 0
B: 0
Step Three: Make a second selective coloring layer with the following values:
Reds:
C: -100
M: +16
Y: +100
B: 0
Yellows:
C: -100
M: +15
Y: +22
B: 0
Neutrals:
C: +17
M: -11
Y: -18
B: -17
Step Four: Our coloring is now complete. Now we'll add the tiny text box, which honestly, I'm a little obsessed with right now and you will see in most of my icons ^.^ Make a new, blank layer by selecting Layer > New > Layer, or ctrl+shift+n, and stamp a tiny text brush on it in black. Here is the brush I used, made by graphic_xl, who I think no longer exists >.<
Step Five: Use the Rectangle Tool to draw a small white box around your brush stamp. Make sure the edges are sharp, and your settings are all at default (100% opacity, normal blend mode, etc - all these settings are at the top below the toolbar after you click on the Rectangle Tool). The box will be on it's own layer, which will be on top of the brush layer.
Step Six: Drag the white box layer down below the brush layer, and nudge it into place. Then flatten your layers and save!
Too lazy? Already a selective coloring pro? Download the psd file here.
Helpful Hint: If you've read any other tutorials I've done, you may or may not notice that I have used many of the same selective coloring settings, either alone or in tandem with other selective colorings. I have found it helpful that when I find selective coloring settings I like, to save them in their own folder, and then when I'm making graphics, to simply load them and mix and match. Below is a mini-tut on how to save and load selective colorings for later use (so you don't keep having to type in all those obnoxious numbers every time you want to use a particular coloring):
- Start by creating a folder especially for saved selective coloring settings. For convenience, I put my Selective Coloring folder inside the Photoshop Presets folder, where your default brushes and patterns are stored automatically.
- After you enter your selective coloring values into the Selective Color Options box, click the Save button. Find your folder, name your coloring (I have mine named numerically, 1 through 14 so far), and click Save.
- To use your saved coloring later, make a new selective coloring layer, and when the Selective Color Options box comes up, click Load. It should take you to your specified folder. Select a pre-saved coloring and click OK, and it will automatically apply the coloring to your image. Don't like it? Click the Load button again to select another. When you find one you like, simply click OK to close the Selective Color Options Box.
+ Don't Forget To:
+ Comment, especially if you take the psd
+ Feel free to ask questions
+ Let me know if there's a broken link or something I've forgotten
+ Share something you made! :)
no subject
Date: 2008-05-03 02:50 pm (UTC)no subject
Date: 2008-05-03 03:06 pm (UTC)